Current State

Current State
Updated with a fancy new watering system

Sunday, October 28, 2012

The Cost from the Bottom Up

I had a bit of criteria for my attempt at this garden for the summer of 2011. The previous year, I had three buckets for a garden, and it didn't leave me a lot of room for variety. With this new garden layout, I had a lot more room to play with. I wasn't going to be too picky though. Mostly, I wanted it to be 1) under $100 to build and 2) not permanent. I don't want to live in the apartment forever, so I want to be ready to leave if the opportunity presents itself. But, if I'm going to put a lot of time into something like gardening, I don't want to have to walk off and leave it all behind. I decided the first priority for my garden was to make it easy to deconstruct and transport if necessary.

The pieces to my puzzle
Originally I wanted 5 gallon buckets to hold cement around my posts. However, to keep it even easier to disassemble, I settled on cinder blocks, one for each of my two posts, and I set them on the ground with the extra hole in opposing directions. I put the pole into a hole and braced it with 2x4 blocks we had laying around from previous projects and tightened the hold with shims (also spares) to keep the poles braced upright.
  • Two cinder blocks $1.58 each - $3.16 total
 I didn't want a huge garden. Davis (in my first blog post) had three posts with four pipes hanging, two on either side, and that looked too big to me. I decided on a shorter set-up, so I purchased two 4x4x6 weather treated poles to hang my pipes on.
  • Two 4x4 poles $6.50 each - $13.00 total
PVC comes in 10' sections, so with the shorter length, I figured I could buy two pipes and cut them in half. My husband's grandpa offered to let me look through his scrap pile and see if there were any pieces I could salvage. I decided to see if I could add the three extra pieces (one full, one half-length pipe) I took from him and add it to the two full pipes to give me more growing room.
  • Two 4"x10' PVC pipes $10.68 each - $21.36 total
I was fortunate to have gotten the drill we used the year before to put up my flag, so that didn't count in our purchasing costs. Neither did the 2" hole bit we borrowed from Grandpa. 

To fasten the pipes to the poles, I used galvanized hanger tape and 8 x 1 - 1/4" lath screws.
  • 25' roll of galvanized hanger tape $4.08
  • box of lath screws $5.24
For the ends of the pipes, I needed something that would let air in and keep water in as well. I picked fiberglass screen as my material of choice and cut squares that would cover the ends of each pipe. To hold it on, I used two black 18" cable ties; one before the screen went on to create some resistance, and one after, placed inside the first, to hold the screen onto the pipe.
  • 36"x84" fiberglass screen $5.98
  • Two packages (15 each) of 18" black cable ties $5.75 each - $11.50 total
I didn't want to have to worry about the nutrients in the soil, so I bought a bag of Miracle Grow (2 cu. ft.) and used less than half the bag to fill all seven pipes. I might have gotten a deal, but I didn't record the price because I purchased it before deciding to plant the pipe garden.
  • 2 cu. ft. Miracle Grow Potting Soil (averages around $11)
With tax, that came in right around $80 for materials. Different locations, previously owned or donated materials, timing, sales, etc. will make that number vary, but that was my material cost that summer.
The finished product, with plants already installed!

Putting the Pieces Together

Before you read this post, check out Plans, Specs and Other Details. It explains what each piece of this puzzle is and why I chose these materials. Feel free to alter your design to suit your desires, but don't fault me if it doesn't work. If it does, do share because I'm always looking to improve. It took us about a day to get it all together (not including most of the planting or the watering system we added afterward) because of all of our trial and error.

To start:
Once you have chosen your garden location you need to set your posts. I put one cinder block with the extra hole facing north, and the other a little less than five feet away from it with the extra hole facing south. (You'll want to have a little pipe overhang so you can attach your pipes to the outer edge of the posts) In each of the aligned holes, place your post close to the inside edge of the hole, and shore it up with spare pieces of 2x4 until it's tight, then hammer in shims to tighten it even more. When the post won't move without taking up the cinder block with it, you're ready for step two.

Prepping the pipes:
When you're ready to start with the pipes, you'll want to mark your holes. Leave room for the zip ties and screen on each end. My pattern was:
3" 4" O 4" O 4" O 4" O 4" O 4" O 4" O 4" O 4" O 3"
I had nine holes (O) across the top of each pipe, and staggered them so when the plants hang down, the open areas below are utilized. After using them that way for a while, I have concluded that less is more. Spacing them out will give you less plants overall but if you choose plants that get really bushy or need to "breathe," spacing them out would be a great idea.

Secure the pipe somehow so the hole saw bit doesn't kick your pipe back or spin off and try to drill through your shoe or your table. Sean stood on the end of the pipe that he placed on the ground and slowly started the hole until it really grabbed, then finished cutting the hole. We used a 2" hole saw bit, but 2 1/2" might be better if you choose to use deeper pipe. Don't drill all the way through the pipe, just through one side. Clean all the shavings out from around the hole and inside the pipe.

Covering the ends:
Take your roll of screen and cut a square large enough to have an inch and a half of extra at the least on all sides. You can use one as a pattern if you like it, but I liked to do them one at a time because some of our cuts on our leftover pipes weren't very straight and I seemed to need more to completely cover the hole.

Take one zip tie and place it 1/2" to the inside of the edge of your pipe. Don't tighten it as tight as you can until you have checked to make sure you have it where you want, but be sure to get it tight when you're happy with the placement. Trim the excess. (*Try to keep both zip tie latches near the bottom third of the pipe. The top third is where the holes are and the middle third is the back where the pipe will be snug against the pole). Place the screen over the end and adjust it to where you want it. I cut a slit in the corner where the zip tie latch was so I could slide it over the latch and help hold it in place. Get another zip tie started but keep it really wide so you can slide it over everything. Pull the screen taught and slip the other zip tie over it all, tightening gradually. Make sure the second tie is on the inside of the first tie. This will help keep everything from slipping off the pipe if you can't get it tight enough with all the gathers of extra screen. Adjust the screen so the folds of extra screen on the edges are smooth. When you are happy with how it looks, pull it tight and trim the extra off the tie and the screen, leaving about 1/2" of screen on the far inside edge.

Before you cover the other end, hold the pipe at an angle with covered end down and hole side up. Trowel some soil into the pipe until it's full enough but not packed (you need room for plants and watering). Then repeat the process of covering the other end of the pipe.

Attaching the pipe to the posts:
Measure an even distance for the amount of pipes you want. Don't put the top pipe right at the top of the post or your garden will be really top-heavy. Don't put it too close to the ground either or the neighborhood rabbits will make a snack of your garden and you won't be able to mow underneath. I put four on one side and three on the other. Simple math will tell you that if you start 18" from the ground, you center the first pipe at 18", the next 18" above that and the next 18" above that if you have three. If you have four pipes, start at 18" from the ground, then 13.5" every pipe thereafter. You can adjust to your liking, taking into account the plants you want to plant. I put the heavy ones like tomatoes at the bottom and lighter, shorter ones at the top, like lettuce and spinach.

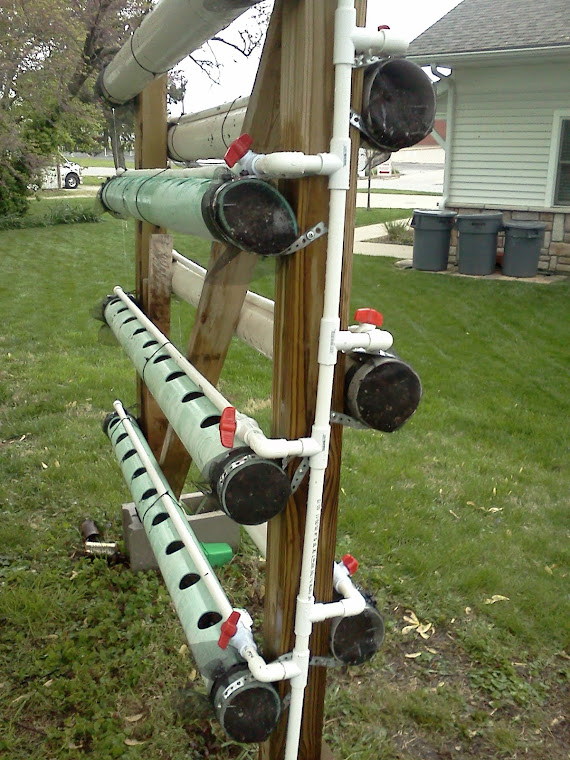
Have someone help you hold the pipe up snugly against the post. Take a length of hanger tape and measure about an inch and a half at the top to screw the tape to the post. You might not want to screw it on just yet. Twist it a quarter turn to the right and, with the twisted part as close to the pipe as possible, tightly measure around the length of the pipe (over the screen) until you get back to the post, then quarter twist it back so the tape runs against the post and leave enough to screw onto the post. Cut the hanger tape and twist it back so you can measure (line up the holes in the tape to make sure you have the same length). You can cut as many of these as you need, but don't twist them until you get them up against the pipes. Place the middle of the length of tape at the front of the pipe HOLES FACING UP to the sky and screw a lath screw into that hole. Go easy, or you'll have the same bounce-off effect as the hole saw bit earlier. You will have to put some muscle into it unless your screw is a good self starter. The ones I purchased probably couldn't be described that way. Screw the top part of the tape to the post so the middle of the pipe matches up with your measurements, then holding it as snugly to the post as possible, pull the hanger tape as tightly as possible and screw the bottom part to the post. Repeat on each end until all pipes are secured.

Support:
This is the best time to put the cross post in, because now you won't have a lot of play in your posts with all the pipes secured. The whole thing will probably slide to one end or the other if you gave it a good push, but you don't want to do that and make it collapse. Take your 2x4 with the angled ends and slide it down the top between the posts. Secure the bottom end against the post and just above the cinder block. The upper angled end should fit just as snugly against the opposite post. Screw it in place and you should have a lot less give in the side-to-side direction (no swaying).

Watering system:
If you're adding a watering system, which I highly suggest, now is the time to add it. Cut enough 5' lengths of 1" PVC to have one for each pipe you've installed. Put a cap on one end of each pipe. On the other end, attach a valve, then enough extra pipe to get to the end of the planting pipe. Attach an elbow to the extra piece. Attach one of these to the top of each of the planting pipes with a zip tie in the middle of the pipe between two holes. Starting at the bottom, cut a length of pipe that will give you enough room to attach your hose at the ground and put a t-connector on top of it. Put a length of pipe from the elbow on the bottom watering pipe to connect it to the t-connector at the middle of the post. Add another length of pipe to get you up to the next watering pipe and repeat until you have connected each watering pipe to the middle supply. At the last pipe at the top, after connecting to the t-connector, add a small length of pipe and cap it. Attach your hose with a hose connector elbow. Then, with a very small bit, drill a hole angling down into each of your planting holes for the water to shoot out and down into the planting hole. Try to catch and clean out all the shavings. If you need to, you can uncap the ends to flush out the shavings that have gone inside the pipe. Turn the water on and adjust your valves until the water pressure sends water out to the farthest holes.

Planting:
I have only planted grown plants in the pipe garden so far. Next year (2013) I plan to try starting some seeds in the holes. I lose a lot of seedlings transferring them from the warmth of my dining room to the hazards of the outdoors. I also harden them in soup cans, so when it was time to transplant them to the pipe garden, I really had to squash the roots to get it to fit through the small hole. If you are planting with a lot of existing dirt and roots, you might want to push some of the dirt in the pipe to the sides so you can fit everything into the space. I don't claim to be a "green thumb" but this has worked well for me in the past.


Plans, Specs and Other Details

I made up my garden plans to fit the space and materials I had available. We rent, so putting in something permanent wasn't the best option for me. At first I wanted to sink my posts in buckets full of concrete, but even that seemed too permanent. I wanted to be able to disassemble the garden and easily transport it at any time if we decided to move on to a different location during the growing season.

Location:
I had a small patch near a tree that would get morning sun and evening sun, but not high-noon or early afternoon sunlight. It was close enough to get a hose to and level enough to set a vertical garden on without a huge slant one way or the other. I assumed there would be enough rain to supplement my watering, but I've found that the density of the leaves above the garden really blocked a lot of the rainfall. Live and learn.

Base:
For the base, I decided on two cinder blocks. The holes were large enough to put my posts into and brace tightly with spare pieces of 2x4 and shims. They were heavy enough to turn each one the opposite way and create a "foot" for each side to have a little extra balance.

Beams:
The two beams I used were 4x4x6 #2 treated posts straight from the store. They were tall enough for me to put the amount of pipes I wanted along both sides, and sturdy enough to hold the weight. I didn't want them any taller because then I wouldn't be able to reach the plants in the top pipes. As it was, the first year I had to stand on spare pieces of 4x4 blocks to reach the highest pipe for watering and picking.

Pipes:
I used 4" PVC pipe because part of the materials I had already accumulated included three leftover 4" pipe sections from my grandpa which we trimmed to the right length. *NOTE* After two years of using it, I would probably suggest not going any smaller than 6" pipe. There doesn't seem to be enough dirt to really get a good healthy plant with room for the roots to grow and spread out. My finished product included seven 5' lengths of pipe. I picked 5' length because the pipe comes in lengths of 10' and it was easiest to have the poor little guy at the store just cut the ones I purchased in half. It rode home in the car pretty easily that way too.

Attachment:
To hook the pipe to the post, I decided I would like to use galvanized hanger tape. It is malleable and has evenly spaced holes I could easily put my screws through at any point I needed to tightly secure all the pieces together. It isn't very thick, so I would suggest doubling each length of tape to help it stay strong. I haven't tried any other material for fastening, but as long as it wasn't stressed, it has worked fairly well for me. The pieces that had been stressed were easy to replace in the spring. With the 4" pipes and not doubling the tape strips, I had quite a bit left over from my 25' roll. Even with replacing about half of my strips this summer, I still have a quarter-width tight roll of tape left.

Hardware:
I used 8x1-1/4" lath screws to attach the pipe to the post with the hanger tape. They have a shallow head that's like a thick washer that keeps the hanger tape from slipping off the head of the screw, and are long enough to sink deeply into the wood. They also hold tightly through the pipe to keep the tape secured where I want it wrapped around the ends of the pipe.

Screen:
Over each open end of pipe, I covered it with charcoal fiberglass screen. I bought a piece 86"x84" and had plenty left over. It holds the dirt in without letting too much get through and water runs out easily. At times, this has posed a bit of a problem because if the soil ever dries out, water runs through the cracks and rushes out the ends instead of building up and saturating the soil. If you don't think mold would be much of a problem, perhaps trying some other material would be beneficial. I haven't tried anything yet, so I don't have any suggestions.

To fasten the screen to the pipe, I used 18" cable ties. There were 15 per package, so I needed two packages because I used two ties on each end of the pipe. I haven't had any problems with the ties or the screen, except when I tried to tighten the screen too tightly to an unevenly cut edge of the pipe and tore the screen. It hasn't posed a problem so I haven't repaired it. If you tighten the ties tight enough, I don't think you'd ever have a problem with them slipping off.

Soil:
I chose to use potting soil with fertilizer. Two cubic feet filled all seven pipes far enough for me. I didn't want them too full so the water could run across the top. If you got 6" pipe, you'd have to account for the extra diameter and purchase accordingly.

More support:
About midway through the first summer, we had a really strong storm that blew my garden over. It weakened the hanger tape and gave the whole creation quite a twist. When it happened again after another storm and I lost some of my plants, I decided the problem was that I didn't have enough support through the middle of the garden. I took a length of 2x4 off our scrap wood pile and cut a 45 degree angle off both ends of the board. (Make sure you cut your angles the same direction on each end, not toward each other. Do it like this /_/ NOT like this /_\ or this \_/). This creates a brace to slide into the middle and screw to both posts to make a capital "N" shape. It helps fix the twist and the potential to slide and collapse one way or the other.

Second Year Watering System:
After trying to water with a hose the year before, I decided I wanted a watering system. At first, it took a long time to water each hole enough to soak it in without running off. After the plants grew, it was even harder to get to the holes in the pipe (nearly impossible with plants like cabbage that grew close to the pipe and spread out wide).

We purchased 1" PVC pipe (five 10' lengths) and eight caps - seven caps to put on each far end with another cap for the end pipe. We needed seven elbows to attach the watering pipes to the end pipe and later purchased seven valves to control the water pressure. We pieced each capped watering pipe length to an elbow branching off from the end pipe that ran up the length of one post. At each junction we had a t-connector, so we had to buy seven of those as well. At the bottom of the end pipe we placed a hose connector so I could screw it on and slide it onto the open end of the pipe to force the water up and into the watering system.

We used our leftover zip ties from the year before to secure the watering lines to the pipes. If you don't have any extra, you'll need to purchase more.

Don't forget the plants!
Both years I have planted tomatillos and tomatoes in the pipe garden. I wasn't as ambitious or successful as the first year when I planted cabbage, peppers, lettuce, broccoli, spinach, and cauliflower. Note that all of those plants are NOT root vegetables. You could try to plant things like carrots or potatoes but they would be limited by the amount of space you have to grow them in and getting them out would probably take some work - you'd have to disassemble parts of the pipe garden to be able to push them out with all the dirt. I don't think it's worth it to me, but if anyone gives it a successful try, I'd love to hear about it.    

Sunday, April 15, 2012

Where My Idea Came From...

I work at the local paper, and one of the highlights of my job is choosing the "extra content" that goes in to fill up pages we don't have ads or content for. They're called SDP pages, and there was one titled Tube Garden with an article by Clare Howard that caught my eye.

It highlighted a man named Maj. Clark Davis and his PVC pipe garden. HE said in the article that he had heard about it on Survival Blog and tried it because he "Didn't want to invest in a rototiller or put up a fence to keep out rabbits...didn't want to tear up [his] lawn and [he] didn't want to spend hours weeding.

That sounded like a pretty sweet deal to me, so I checked out the Survival Blog. For the life of me, I couldn't find anything specifically talking about a pipe garden. So, I Googled "pipe garden". To my surprise and delight, I came across a lot of ideas, including this blog for very generic PVC Pipe building ideas by Peter Duke in Orlando, FL.

Davis' concept (according to Howard's article) included 10' long 6" diameter PVC pipes. He hung them horizontally on three 4x4 posts set in concrete, with the lowest at 1.5' off the ground. He covered the ends of the pipes with screen and drilled a 2" hole each foot. Duke's blog said he used 4" pipe with 2.5" holes, and instead of using a sprinkler like Davis, Duke installed a drip irrigation system.

Looking over all the information I had, I decided to build a garden of my own, modifying the suggestions I'd found and drawing up the plans I intended to use.